To integrate Microsoft Entra ID (formerly Azure Active Directory) with Komodor for Single Sign-On (SSO) and role provisioning, please follow the steps outlined below.
Prerequisites
Obtain the Identifier (Entity ID) and Reply URL (Assertion Consumer Service URL) from Komodor Support. These values are required during the SAML configuration in Entra ID.
Section 1: Registering Komodor as an Enterprise Application in Entra ID
-
Access Microsoft Entra ID:
- Log in to portal.azure.com and navigate to the Microsoft Entra ID dashboard.
-
Create a New Application:
- Select Enterprise applications from the sidebar.
- Click on + New application.
- Choose Create your own application
.
- Enter Komodor as the app name and select Integrate any other application you don't find in the gallery (Non-gallery).
- Click Create.
- Select Enterprise applications from the sidebar.
Section 2: Setting up SSO with SAML
-
Set Up SAML-based SSO:
- In the application overview, click Get Started under Set up single sign on.
- Select SAML as your preferred SSO method:
- In the application overview, click Get Started under Set up single sign on.
-
Basic SAML Configuration:
- Click Edit in the Basic SAML Configuration section.
- Enter the following details:
- Identifier (Entity ID): Enter the value provided by Komodor Support.
-
Reply URL (Assertion Consumer Service URL): Enter the value provided by Komodor Support.
- Click Save.
- Click Edit in the Basic SAML Configuration section.
-
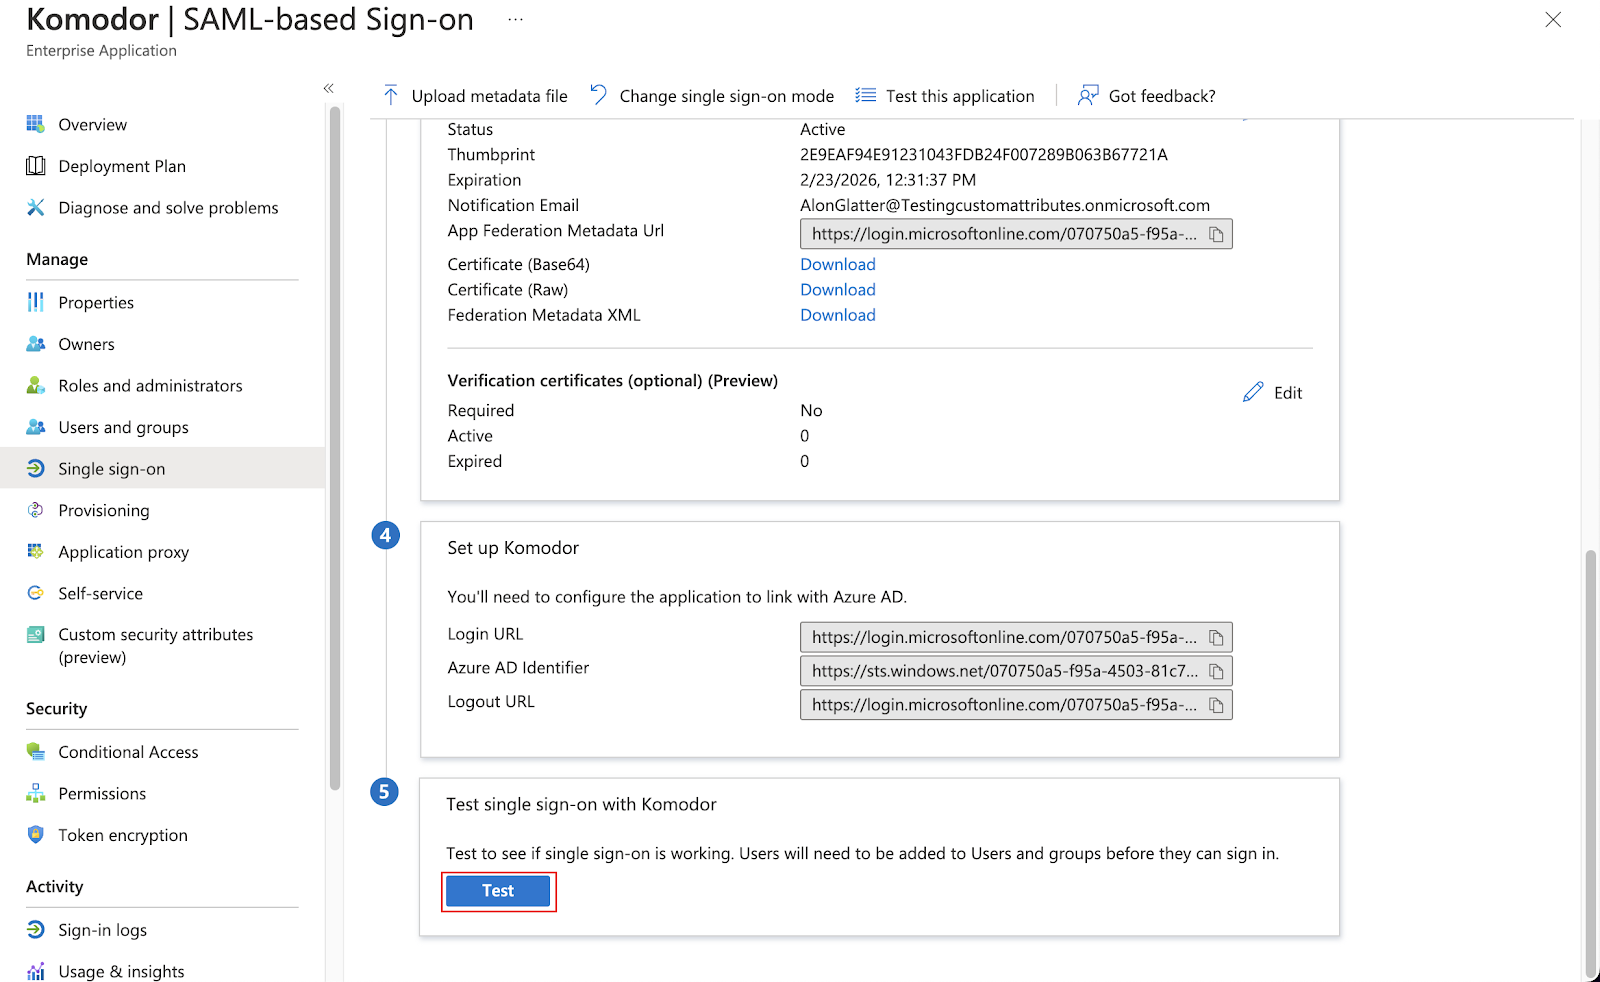
Download Certificate and Login URL:
- Scroll down to the SAML Certificates section and download the Certificate (Base64).
- Copy the Login URL from the Set up Komodor section.
- Provide both the certificate file and Login URL to Komodor Support to complete the SAML setup.
- Scroll down to the SAML Certificates section and download the Certificate (Base64).
-
Test SSO with Komodor
- Once Komodor Support has received your both your certificate file and Login URL and has completed the necessary configuration on Komodor's end, click the "Test" button to Test SSO with Komodor
- Once Komodor Support has received your both your certificate file and Login URL and has completed the necessary configuration on Komodor's end, click the "Test" button to Test SSO with Komodor
Section 3: Defining App Roles for Role Provisioning
To automatically map Entra ID users to Komodor roles based on their membership in Entra ID groups, we'll be utilizing the App Roles capability.
For each Komodor role you wish to assign to users/groups in Entra ID, you must create a corresponding Entra ID App Role. If a user is a member of an Entra ID Group whose name or ID matches an existing Komodor Role, the system will assign the appropriate role.
Note: In Komodor, roles assigned via SSO/SAML attributes take precedence over roles explicitly assigned within the platform. When a user logs in through SSO, any pre-existing roles assigned to that user which do not match their SAML-assigned roles/groups will be removed, ensuring that access is consistently managed through your identity provider.
-
Navigate to App Registrations:
- In Microsoft Entra ID, select App registrations.
- Choose All applications and select the Komodor application you just created.
- In Microsoft Entra ID, select App registrations.
-
Create App Roles:
- Navigate to the App roles section.
- Click on + Create app role.
- Fill in the required fields:
- Display name: Enter the role name as it appears in Komodor.
-
Value: Enter the role ID or role name as defined in Komodor.
-
Note: The Value must either be the role ID or role name exactly as it appears in Komodor:
-
Note: The Value must either be the role ID or role name exactly as it appears in Komodor:
- Description: Provide a brief description of the role.
-
Allowed member types: Select Users/Groups
- Finally, click Apply.
- Repeat these steps for each Komodor role you wish to add. They will be visible in the portal like so:
- Navigate to the App roles section.
Section 4: Assigning Roles to Users or Groups
-
Assign Roles:
- Navigate to Enterprise applications and select the Komodor application.
- Click on Assign Users and groups.
- Select + Add user/group.
- Choose the users or groups to assign roles to.
- Select the appropriate role from the list of defined app roles.
- Click Assign.
- Navigate to Enterprise applications and select the Komodor application.
Having done that, you can see an overview of the Users and Groups along with their assigned roles:
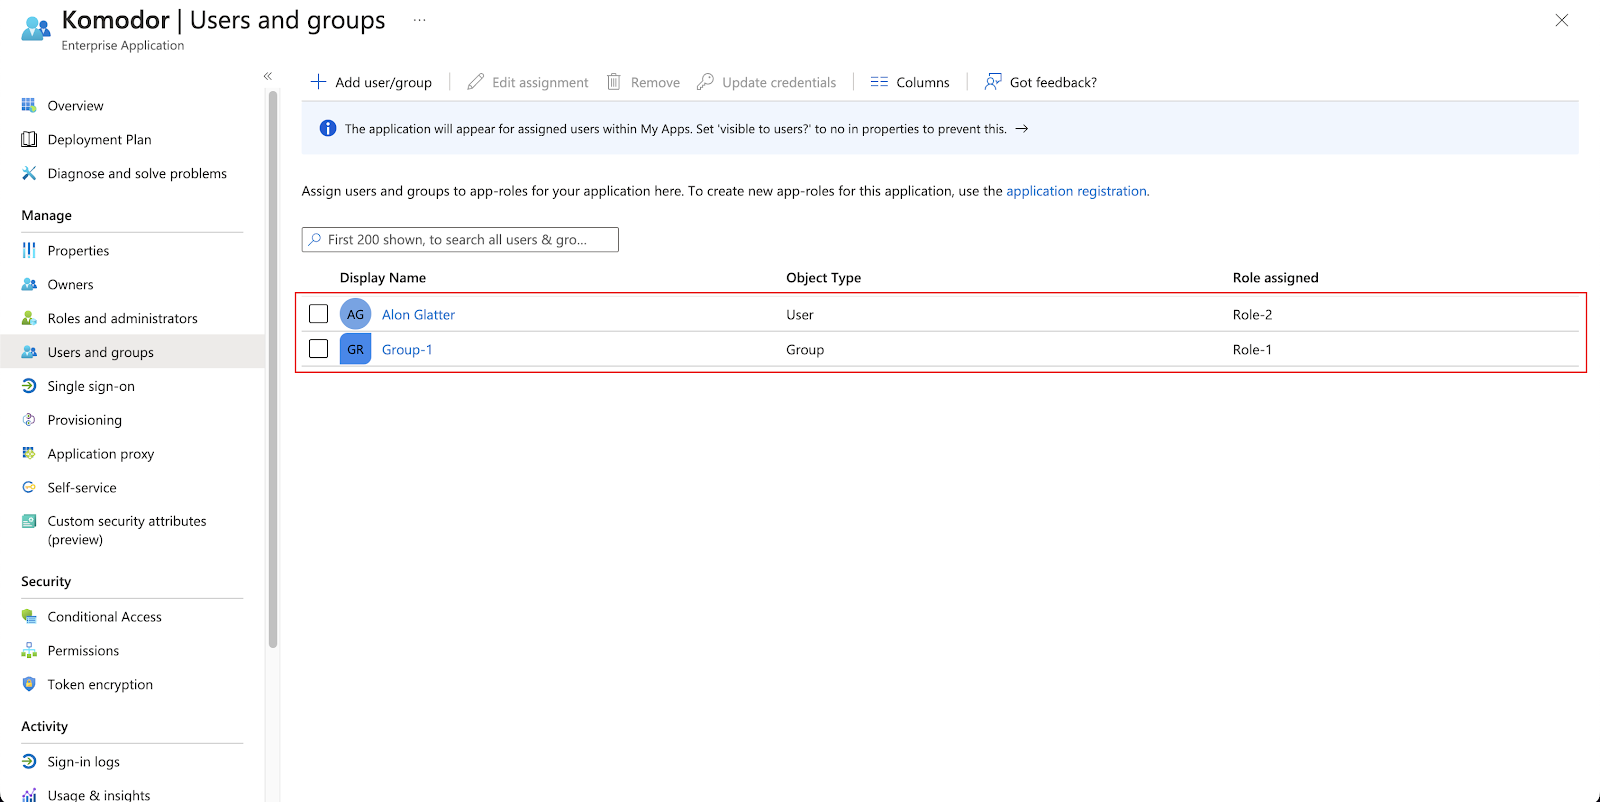
Note: Group members automatically inherit the roles assigned to their group. In the above screenshot, because 'Alon Glatter' is a member of 'Group-1,' he will be granted both 'Role-2' and 'Role-1,' the latter being assigned through his Group-1 membership.
Section 5: Configure SAML Token Attributes for Role Mapping
-
Edit User Attributes & Claims:
- In the Single sign-on section of the Komodor application, click Edit in the Attributes & Claims section.
- In the Single sign-on section of the Komodor application, click Edit in the Attributes & Claims section.
-
Add New Claim:
- Click on + Add new claim.
- Enter the following details:
- Name: komodorRoles
- Name format: Basic
- Source: Select Attribute.
-
Source attribute: user.assignedroles
- Click Save.
- Click on + Add new claim.
That's it! After completing these steps, Entra ID users will be able to authenticate via SSO with Komodor and their assigned roles in Entra ID will be reflected within the Komodor platform.
Section 6: Handling Unrecognized SSO Users
If a user logs in via SSO and their Entra ID group is not recognized or does not match an existing role, they will not be assigned a role. As an additional fallback measure to enhance security, we recommend that Komodor admins also configure an empty default role. This role will be automatically assigned to users who log in via SSO without any designated Komodor role passed via the SAML attribute.
Steps to Create an Empty Default Role
-
Create a Dummy Policy
-
Create a policy that refers to non-existent resources. For example, use a cluster name with a single space (" ").
-
-
Create a Default Role:
- Create a default role (ensure the "default" checkbox is selected) that references the dummy policy created in step 1.
-
Delete the Dummy Policy:
After creating the default role, delete the dummy policy, leaving the role empty. This empty role will serve as the fallback option for users who are not members of a recognized Entra ID Group and have no roles assigned as covered in Section 4. Users assigned to this role will see no resources in the Komodor GUI unless they are part of an Entra ID Group that Komodor recognizes, or have been manually assigned roles.
Comments
0 comments
Please sign in to leave a comment.