Introduction
This guide will walk you through the steps to create, edit, and delete Workspaces. Depending on your needs, you can choose from several methods—each designed to fit different operational scenarios.
As a reminder, here are some of the common business cases that Workspaces can be used to resolve:
Key Use Cases
-
Multi-Tenant Environments: Easily create workspaces that segregate resources by team, environment, or application, ensuring that users see only what is relevant to their role.
- Operational Efficiency: Quickly switch between different views of your Kubernetes environment—whether you need to focus on production clusters or specific namespaces —without compromising security.
Prerequisites
In order to begin setting up and/or editing workspaces, please ensure you have the necessary RBAC permissions; manage:workspaces.
Getting Started
- In order to set up Workspaces you'll need to go to the Organization Settings (⚙️) -> Configurations -> Workspaces
- Once in the Workspace Management page you'll see the list of existing workspaces, in order to create a new workspace select Create Workspace.
- Select a Name and Description for the Workspace in the wizard.
- Now we need to create the Workspace definition - Choose which workspace Type you'd like to create;
- Cluster-based
- Namespace-based
- Selector-based - based on label/annotation (for example - scope all labeled resources with specific team label)
Workspace Types
Workspace by Cluster
Definition: Filter resources by set Cluster Name(s) or Clusters selection.
Process:
- When in the Workspace Management page, select Create Workspace.
- Select the Cluster option as the type.
- Enter a pattern (e.g. *prod*) to include certain clusters and an exclude pattern (e.g. *-staging) to filter out unwanted clusters, or use the "is" operator to select single or multiple cluster selection.
Workspace by Namespace
Definition: Filter resources by Namespace selection/exclusion.
Process:
- When in the Workspace Management page, select Create Workspace.
- Select the Namespace option as the type.
- Enter a Regex or Wildcard pattern (e.g. All Namespaces that begin with 'tenant-1' but excluding 'tenant1-system') or use the "is" operator to select a single or multiple namespace selection.
- Optional: Limit the workspace to specific clusters by providing a cluster wildcard pattern.
- Optional: Limit the workspace to specific clusters by providing a cluster wildcard pattern.
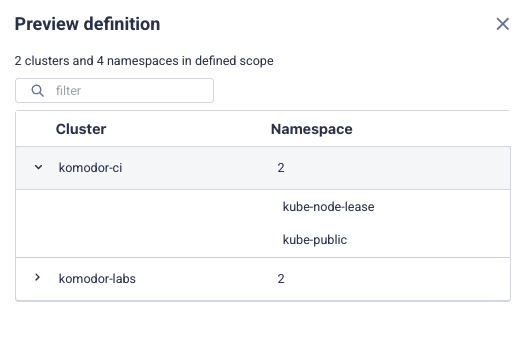
You can always preview the definition for what clusters and or namespaces are included.
Workspace by Label/Annotation
Definition: Dynamically filter resources based on labels or annotations. Any resource—including Deployments, Pods, Secrets, ConfigMaps, and more—that matches the defined label/annotation patterns or values is automatically included in the workspace.
Please note: Access is determined only by matching labels and annotations.If a Deployment has the required label but its Pods don’t, the Pods tab will show empty.
Prerequisites
Before beginning to create Workspaces by Label/ Annotation you need to ensure you have Tracked Keys (Documentation Link) Set up.
Process:
- When in the Workspace Management page, select Create Workspace.
- Choose a Key from a predefined list (up to 10 allowed keys in Tracked Keys (Link to Tracked Keys in the Komodor Platform).
- Enter the wildcard pattern for values, including any excludes.
-
View the real-time preview of matching resources (services, pods, etc.) with 📋 Preview definition.
Please note: Workspaces based on labels/annotations will be limited to 5000 services
Editing & Deleting Workspaces
- To Edit a Workspace definition, go to the Workspace Management section.
You'll need to go to the Organization Settings (⚙️) -> Configurations -> Workspaces - Once in the Workspace Management page you'll see the list of existing workspaces, in order to edit an existing workspace select the pencil on the workspace row.
- Make the desired changes and save the definition, all changes will take effect immediately.
- To Delete a workspace definition , go to the Workspace Management section.
You'll need to go to the Organization Settings (⚙️) -> Configurations -> Workspaces - Once in the Workspace Management page you'll see the list of existing workspaces, in order to delete an existing workspace select the bin on the workspace row.
API & Terraform Management
-
Advanced Options:
- Creating, updating, and deleting Workspaces can also be done via API and Terraform.
- This enables automation and integration into your CI/CD pipelines.
- Workspaces V2 API docs
- Workspaces V2 Terraform docs
Workspaces Automation
Overview
Automated Workspaces let you instantly organize your Kubernetes resources into workspaces based on labels or annotations—no manual setup needed. Whether you’re using ArgoCD, Helm charts, or your own custom labels, workspaces will be automatically created, updated, and removed based on real-time changes in your resource's metadata.
Getting Started
1. Create an Automation Rule
Go to Workspace Management > Automation Management. Click Create Automation to start.
You’ll be asked to:
Name your automation - workspace names will automatically begin with the automation name
Choose clusters the rule applies to (you can use either wildcards for naming patterns or multiple selections)
Pick if you're using a Label or Annotation
Define the key
-
Define how to match values using regex
🧪 Preview Mode: Before saving, you can preview which workspaces will be created—based on current label values using the "Dry Run" option
2. What Happens Next
Once a n automation is saved:
Workspaces will be auto-created for each unique value matching your definition.
If new label/annotation values appear later, new workspaces will be created automatically.
If values are removed, the corresponding workspaces will be deleted.
Your rule updates run immediately on save or any update, then every hour afterwards.
Examples:
Automation Name:helm Label:
helm.sh/chart: aws-controller-1.8.1→ Workspace:helm-aws-controller-1.8.1Automation Name:team Label:
komodor-team: barzelim→ Workspace:team-barzelim
Use Cases for Example
When using labels like argocd.argoproj.io/tracking-id or helm, they use different formats depending on how the app was deployed.
Here are the common supported formats and how to extract the application name using regex:
-
Argo CD
Example:my-app:apps/Deployment:default/my-deploy
Regex:^(.+?):.*$
→ Group 1 = my-app
-
Helm
Example:helm:my-helm-release
Regex:^helm:([^:]+)$
→ Group 1 =
my-helm-release -
Team
Example:team:infra
Regex:.*
3. Managing Rules
From the Automation tab, you can:
View all your rules in a table
Edit or Delete rules
See linked workspaces
Deleting a rule removes all its associated workspaces. You'll get a confirmation showing how many will be deleted.
Note: Workspaces created by automation cannot be edited or deleted manually.
Conclusion
Creating and updating Workspaces is streamlined in Komodor. These dynamic filtering tools ensure that your teams only see what matters most—optimizing both performance and clarity.
Comments
0 comments
Please sign in to leave a comment.